Today, I thought I'd take a look at how to go about creating random effect custom line patterns. As usual this is prompted by a newsgroup poster, who wanted to give his work an unfinished or work in progress look.
Custom line patterns aren't as straight forward as they might appear so I'm going to split this post in two: part one will deal with how custom line patterns work in a general sense and part two will look at creating the random patterns themselves.
Before I get going I should point out that there's lots of great information on general custom line patterns out there, first and foremost of which is the Custom Patterns section in Developing Visio Solutions. There's also examples such as John Marshall's sine / cosine patterns and an excellent 'Thought Bubble' post at Green Onions.
Aside from John's wave patterns if you want to get your hands on some example file downloads then check out the end of the next post where Chris Roth has generously added some great resources.
Custom line patterns background
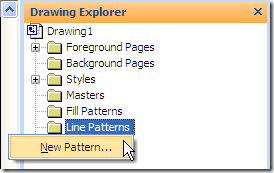
I'm not going to go into every area of creating custom patterns as that's very well covered in the above DVS link, but just so we're on the same page, to create and edit patterns you can right click on the New Patterns... menu item under View / Drawing Explorer Window / Line Patterns as per the this image:
A pattern is effectively just a special type of Master shape and as such you can edit it and copy it between documents just as you would a normal Master shape.
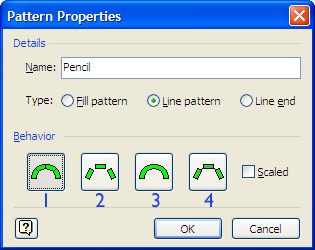
When creating your custom line pattern you have four main options that affect how the pattern instances are applied to a line:
1 - Repeat and bend to fit curved line.
2 - Repeat without bending.
3 - Stretch single instance along length of line.
4 - Repeat on top of line.
Once you've made this choice there are two key things that affect the size of a custom line pattern: scaling and line weight. If you check the Scaled tick box the resulting pattern will be exactly as it is represented in the Master. This is useful if you're trying to represent real world objects that have fixed dimensions (eg the gauge of a train track).
For non-scaled patterns the size of the shape is determined by the weight of the line to which it is applied and how the pattern shape sits within its alignment box. The pattern's thickness and length are handled in different ways (although they are connected, as we'll see), so I'll look at these separately.
(Note - From here on I'm just going to be talking about non-scaled line patterns using the first 'repeat and bend' option.)
Line pattern 'thickness'
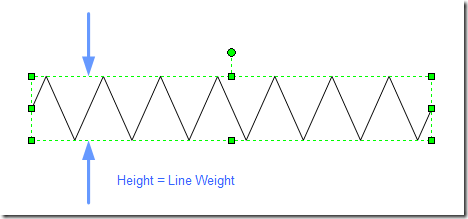
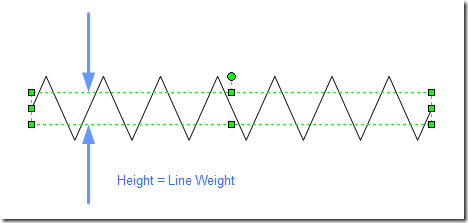
As I mentioned, the line pattern thickness is determined by the applied line weight and this is taken from the height of the alignment box of the pattern shape. For example, the first pattern shape below will be exactly the thickness of the line, while the second one will overlap the line (in this case, by a factor of two).
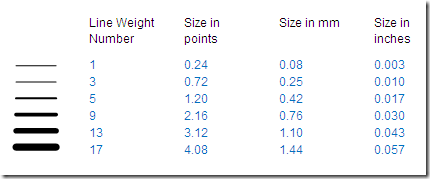
Now, this means that if you apply the top pattern to a line with weight number 1 the resulting line will have a thickness of 0.08mm. That's pretty small and when viewed at 100% it means that you don't get to see any real pattern at all.
Using the second pattern, and the same weight number, results in double the visible thickness (0.16mm). This might still not be enough for most situations, but if you applied a weight number of 17 the result would then be 2.88mm, something approaching useful in terms of visibility.
The point is that you need to think about the line weights in your document as this will effect the way you design the pattern shape. Below is a table of the standard Visio line weights and their respective thickness.
Line pattern length
OK, so that's thickness dealt with. Now, let's look at how the width of a pattern shape behaves when applied to a line.
Visio's built-in and custom line patterns behave differently when sized along a line. While built-in pattern instances are clipped to fit the line length, custom pattern instances are compressed or stretched to fit so that you only get whole instances of the original shape.
A line's pattern instance length is determined by its original shape aspect ratio. Let's use a new line pattern shape to explain what I mean:
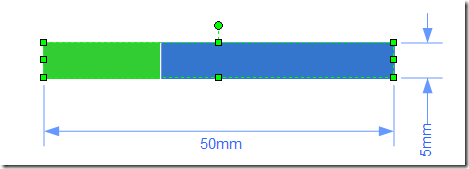
The above line pattern shape is designed in a ratio of 10:1, which means that if your line weight is 1mm then a single 'standard' instance would be 10mm in length. You don't have to be this specific, but using a fixed aspect ratio like this will make calculating the pattern length a good deal easier. (Don't worry that the Master shape has the 5mm and 50mm dimensions. This is just for the Master's page and has no bearing on the drawing page for non-scaled patterns.)
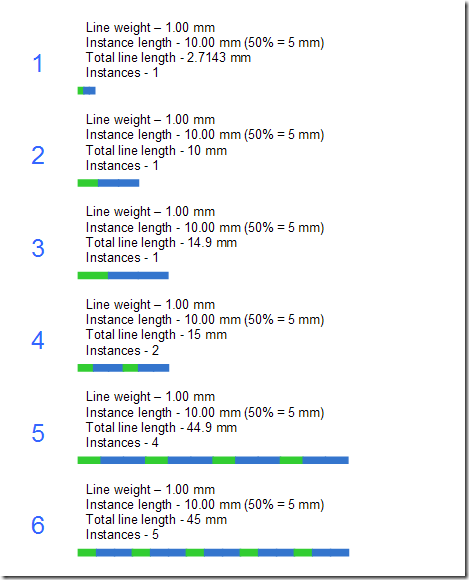
Now, I've used two colours so that you can see the shape instances being repeated and, in the examples below, I've added some inserted fields to the actual line shapes:
The above examples demonstrate what's going on with the allocation of pattern shape instances to the line shape. I'm using a line weight of 1mm throughout so that we know that a 'standard' instance should be 10mm in length. Let me explain each one:
- In the first example the actual line length is less than the length of the pattern shape and so a single instance is compressed.
- Next, the line length equals the length of a single pattern shape and so a single instance is used neither compressed nor stretched.
- Here, the line length is greater than the length of a single pattern shape, but still just within a 50% margin (of the pattern shape) and so a single instance is stretched.
- Now, 0.1 of a mm more pushes the line length over the 50% limit and so now the line uses two compressed instances.
- The final two examples (5 and 6) show that this sequence, of not stretching any instance shape beyond 50% of its original size, is repeated as long as the line is expanded.
Well, I hope this hasn't given you too much of a headache! In the next post I'll explore how to deal with random aspect of line patterns.
Of course, although this particular post is about line patterns, there are two other areas that can be customised in a similar way. These are 'Fill Patterns' and 'Line Ends' and you can find out more about both of them in the DVS link at the top of this post.

