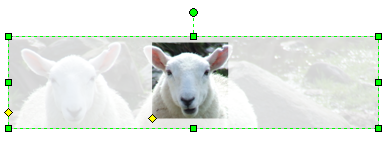
A newsgroup question caught my attention recently and I thought I'd employ the above sheep to help solve the problem. I met them on a walk with my wife on holiday in Scotland and, while they know next to nothing about Visio, they make a useful sample image for this post.
The question - "How do you highlight part of an image in Visio"?
Whilst you can get to a number of image properties via Format / Picture... and the ShapeSheet, spot highlighting (or any other localized pixel-level manipulation) isn't one of them...
So, if you can't alter the image and highlight areas directly, then perhaps another approach would be to mask the image and let the area of interest peep through from underneath. The screenshot below uses just this method and I'll walkthrough the steps required to reproduce the effect.
Walkthrough
1) Add two rectangles to your page, one inside the other, select both and click Shape / Operations... / Combine to create a single shape.
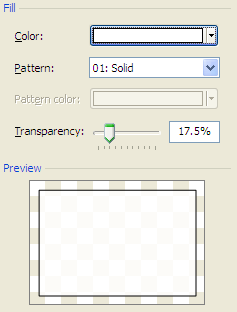
2) Click Format / Fill... and set as follows:
3) Open your new shape's ShapeSheet and you'll find you have two geometry sections representing the inner and outer rectangles.
4) Right-click anywhere in the ShapeSheet, select Insert section... and add new User-defined cells and Controls sections.
5) Add two User cells named User.CutOutWidth and User.CutOutHeight with accompanying dimension values that are less than the shape's overall width and height. (I've used 1.5 inches in the example.)
6) For the controls section, add a second row and change the row names to Controls.Position and Controls.Transparency.
7) You need to restrict the position control to stay within the bounds of the outer rectangle so add the following formulae to the x and y cells:
Controls.Position.X =
BOUND(Width*0.4,0,FALSE,Width*0,Width-User.CutOutWidth)
Controls.Position.Y =
BOUND(Height*0.1,0,FALSE,Height*0,Height-User.CutOutHeight)
8) Next you need to set the inner rectangle's geometry to be based on the position of the control, so change the geometry's section formulae as follows:
9) Finally, you need to set the outer rectangle's fill transparency to track the left control. I'm using this control as a kind of slider, which moves up and down the left hand edge of the shape, with the top representing 100% transparency and the bottom 0%. First, set the control's positional constraints with the following formulae:
Controls.Transparency.Y =
BOUND(Height*0.15,0,FALSE,Height*0,Height*1)
Controls.Transparency.XCon (X Behavior cell) =
1 - visCtlLocked
10) On the transparency end you just need to calculate a percentage value of the control's vertical position vis-à-vis the shape's height. Add the following formula to the FillForegndTrans cell of the Fill Format section:
=Controls.Transparency.Y/Height
11) Close the ShapeSheet and you're done. To use the shape you may need to adjust it's z-order (ie the order in which shapes are stacked on top of one another). To do this, drag the shape over your image shape and if it appears below the image click Shape / Order / Bring To Front.
Other options
This is clearly not the only option. You might, for example, choose to include a third geometry section with an Ellipse and a right-click action to toggle between the cut-out shape's type and/or add further controls to adjust the size and shape of the cut-out.
I've used the BOUND() function here to limit the position of the controls in the shape, but its uses are much wider than this and can be used with any value that you want to constrain. For more information regarding the function check out this post on the Visio Insights blog.
You can download an example document (Download ImageHighlightExample.vsd) covering the above walkthrough, which contains a master shape to get you going.
Finally if you're waiting for the VBA version of the previous Hiding Pages post then I'll get onto that next time, I promise!


